
- Sails & Canvas
- Hull & Structure
- Maintenance
- Sailing Stories
- Sailing Tips
- Boat Reviews
- Book Reviews
- The Dogwatch
Select Page

Rise Up! How to Raise Your Sailboat Mast
Posted by Zoran Glozinic | Dogwatch , Projects , Sails & Canvas

Spring is here and marinas will soon be filled with mast-raisers. And while the world is filled (to the brim?) with mast-raising solutions, I have another. I believe my method is possibly the simplest solution most applicable to a wide range of boats. It allows a sailor to raise a mast independently, without a crane, affording freedom. It also enables a sailor to do it by themself. And while most mast-raising solutions require various panoply of items a sailor needs to either purchase or fabricate—various gin poles, A-frames, lifting poles, winches, 2×6 boards, lawn-mower wheels, and mast supports mounted to rudder fittings on the transom—and while sailors who trailer their boats to various waters have to carry all of that with them, the solution I’ve come up with uses a very small amount of extra equipment, so small it can almost be carried in one’s pocket.
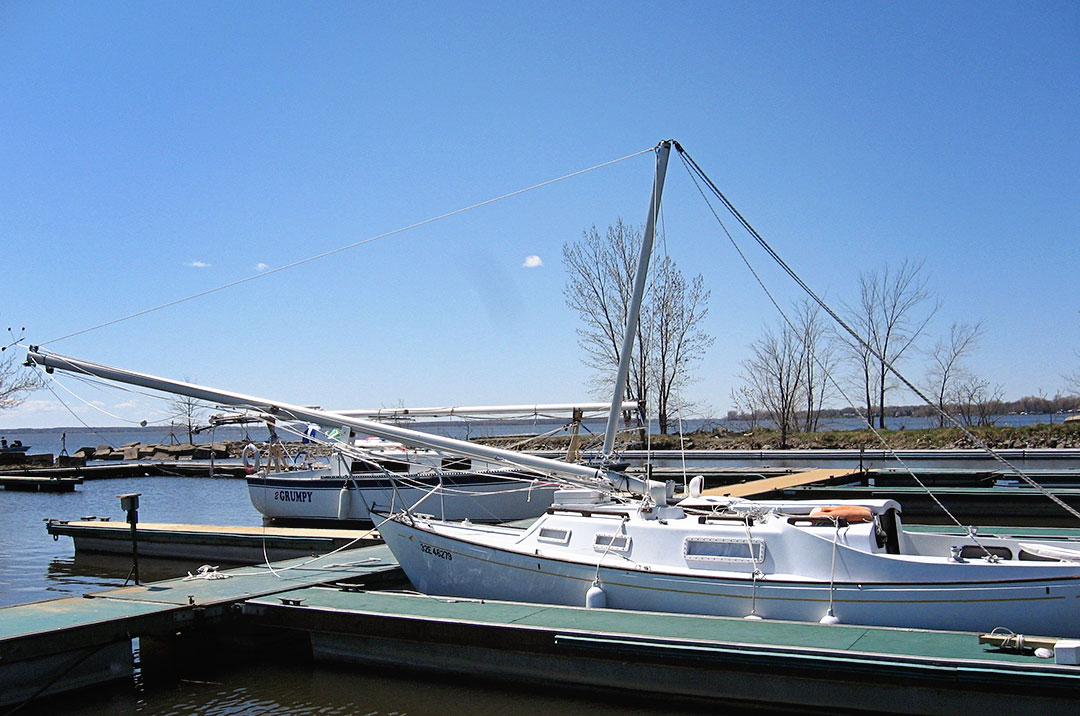
Everything rigged and mast ready to be raised with a tug on the mainsheet.
So, what is required and how do you rig it?
- First, to use my solution, your mast should have a mast base/step or tabernacle on which the mast can pivot. This is common.
- Next, there will need to be an attachment point on either side of the boat, aligned with the mast pivoting point—athwartships and on the same axis. You might need to get creative here because each boat is different. The two attachment points (eyes are fine) can be permanent (as in this photo), or they can be made using a steel ring and two short lengths of steel wire or chain temporarily attached to an existing hardpoint. The wider these attachment points are spaced, the better, because they serve as hardpoints to attach two sets of temporary shrouds.
- About seven feet above the mast step (or as high as you can comfortably reach up the mast when it’s vertical) on either side of the mast, there must be tangs or permanent mounts to attach the mast-supporting set of temporary shrouds. I used a length of ¼-inch threaded rod that passes through the mast and through two small hardwood blocks and two small tangs made from mild steel. I install these tangs when needed, using wingnuts. When sailing, there is nothing on the mast to snag halyards, and the two small holes are not something I worry about.
And that is it for boat modifications.
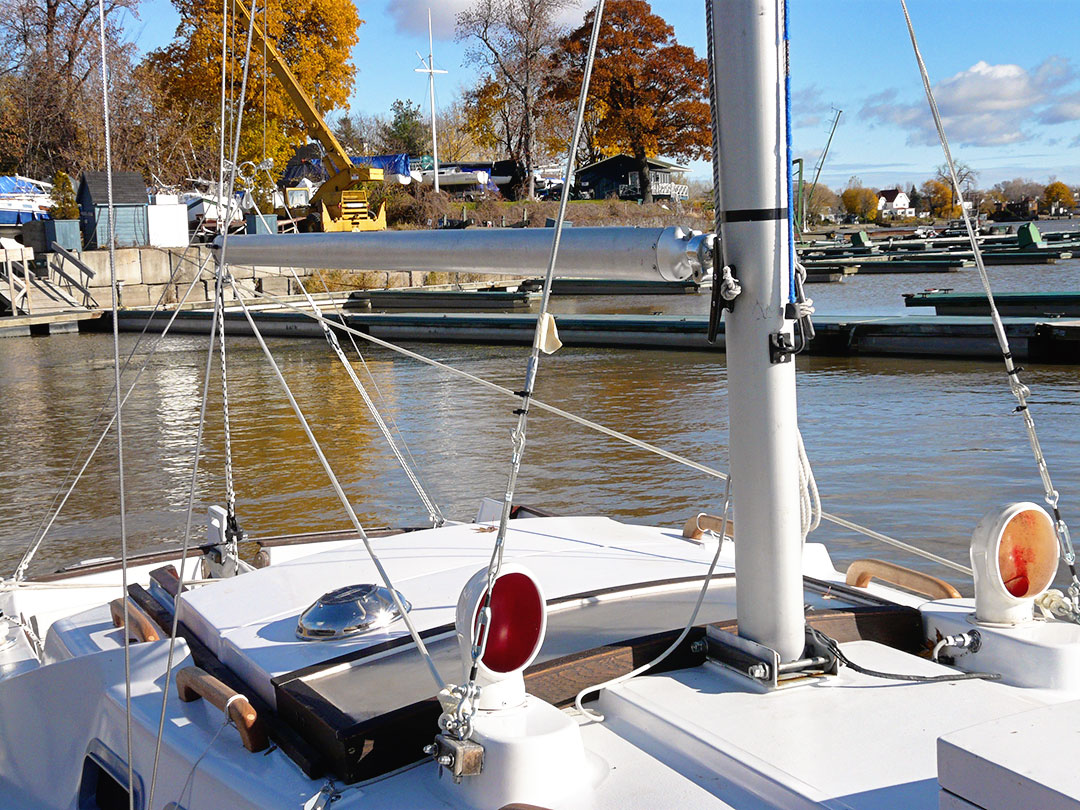
Mast successfully raised, note the athwartships attachment points on the dorade boxes and the two sets of temporary shrouds.
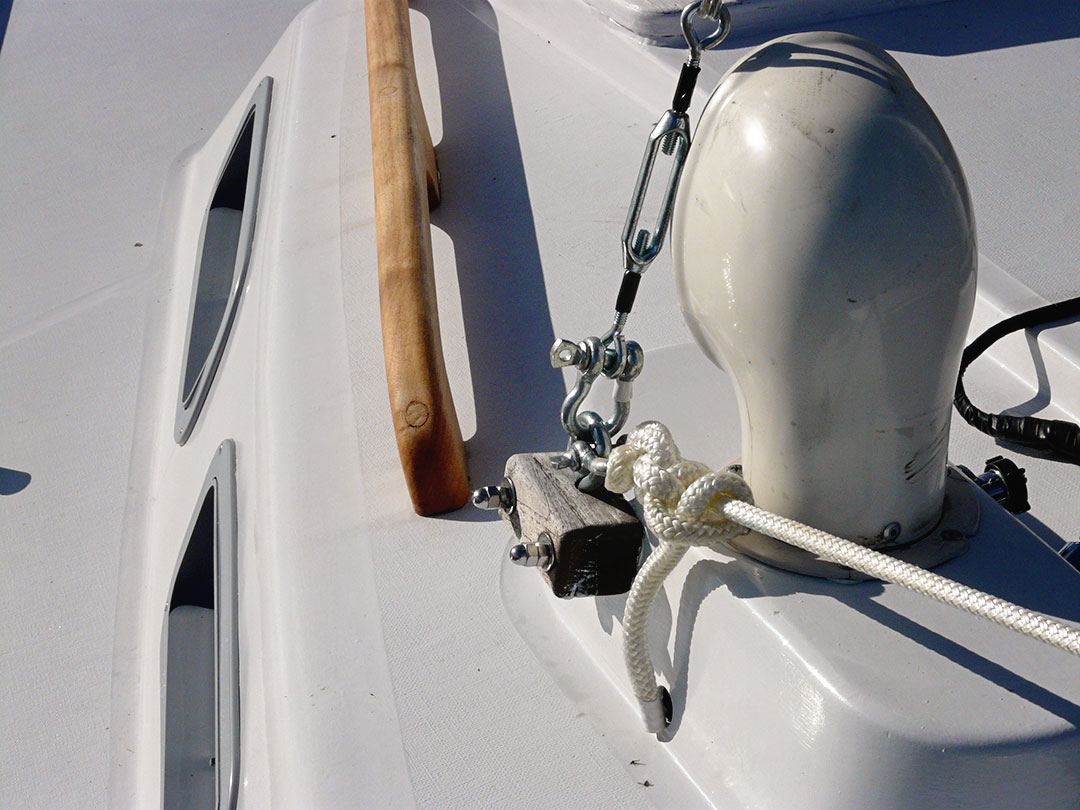
A close-up view of the athwartships attachment points.
To raise and lower the mast, I rig things and operate as follows. In this example, the mast is attached to a pivoting base and stowed lowered onto the bow pulpit.
- Between the athwartships attachment points and the mast tangs, I attach a set of temporary shrouds. These I made from coated wire rope (the same as used for lifelines). These will remain taut for the duration of the mast raising or lowering (because they’re attached on the same axis on which the mast pivots) and serve to prevent the mast from swaying from side to side.
- I attach the boom like I’m ready to sail, 90 degrees to the mast, connected to the gooseneck fitting and with the topping lift and end-of-boom mainsheet rigged. I use the main halyard and boom downhaul to keep the gooseneck fixed (so it cannot slide up or down, if track-mounted).
- Between the athwartships attachment points and the clew end of the boom, I attach a second set of temporary shrouds. These I made from low-stretch braided line and they will also remain taut for the entire mast raising and lowering.
- Once all set, I pull on the mainsheet (rigged with 4:1 block-and-tackle for purchase) to raise the mast. It’s relatively easy and the mast remains in control; I can stop and start at any point in the process if needed.
If my mast was instead pivoted aft and stowed on an aft-rail support, I could still use the same method, but I would have to attach a separate gooseneck fitting on the front of the mast and some separate running rigging to function as the topping lift does.
Happy spring mast raising!
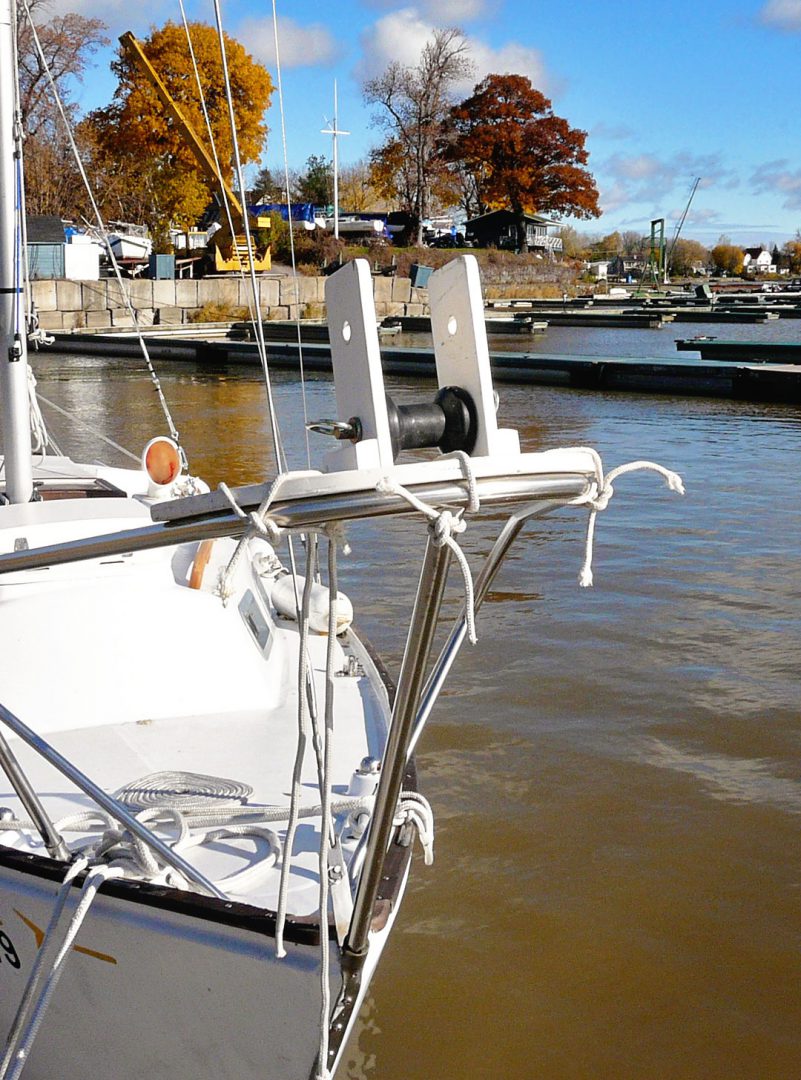
One nice-to-have modification I’ve made is to the pulpit where my mast rests when stowed. I made a wooden mast support mounted on the bow rail. The rubber roller has two positions: the lower position is used for winter mast storage, and the upper position allows for easy mast sliding, fore and aft, when getting it to the exact position in order to install (remove) the pivoting bolt/pin at the mast base or tabernacle. When not in use, I stow this support at the bottom of a sail locker.
About The Author

Zoran Glozinic
Zoran Glozinic is a retired business professional who has been messing around in boats and old cars all his life. He currently lives in Laval, Quebec, where he divides his free time between a good old English bilge-keel boat and a 16-year-old Saab car.
Related Posts

Unfurling the Heart: Book Review
October 1, 2004

A Shakedown Cruise Saved by Tomato Soup
June 8, 2023

Kidnapped from the Caribbean
January 1, 2018
Dogwatch – February 2019
February 14, 2019
Current Edition
Join Our Mailing List
Get the best sailing news, boat project how-tos and more delivered to your inbox.
You have Successfully Subscribed!
production Strider 24
plywood Romany 34
lightweight 14ft Zeta mainhull
Strike 15 trimaran at speed
28ft Skoota in British Columbia
10ft 2 sheet ply Duo dinghy
24ft Strider sailing fast
36ft Mirage open deck catamaran
- All Our Designs
- For new visitors
- About Richard Woods
- Useful Articles
- Testimonials
- Year Reviews (1998-2014)
- Plan Updates
- Links to Owners and Suppliers
- Consultancy Service
- Boats for Sale
- Blog and Facebook Posts
- Our Cruising Blog (updated Jan 26th 2020)
- Download Eclipse logbook (300 page pdf)
- Download Newsletters 1992-2002 (pdf)
- Download Year Reviews 2002-14 (pdf)
- Download FAQs (pdf)
- Download Boat Tests (pdf)
Safe mast lowering method
This photo sequence shows the safe, reliable way one person can lower or raise a mast. It will work like this on boats up to about 10m long with 12m (40ft) long masts. However I have lowered much bigger masts this way with extra help.
Everything is very controlled and you can stop at any time to take pictures or have a beer. The load increases the more horizontal the mast is, so it gets easier as you raise it and more stressed/stressful as it lowers.
This shows the general view just prior to lowering. The boom is being used as a lever.
The photo below shows the simple "gooseneck" I made that goes on the front of the mast. You can also see the simple pivoting mast step
The genoa halyard is attached to the end of the boom and will be used as the "stay" when lowering. There is less load on the system if the "stay" is not at the masthead, so the genoa is a convenient halyard to use. The mainsheet takeoff below the boom is used to attach the winching rope (sorry, slightly hidden behind the furling drum). The rope goes to a (silver) block on the netting beam, or, in this case, on the bowsprit
You can do this as a single purchase, or use a couple of blocks to reduce the winching loads. But be careful that you don't run out of rope, go "block to block" or foul things as the blocks move
If you now tension the winching rope you will be able to release the forestay. However before doing that you want to fit the two temporary "guy ropes". These are absolutely essential for a safe system as they stop the mast falling sideways as the real shrouds slacken. So they must be fitted as wide as practical and, essentially, their bottom take-off point must line up with the mast foot pivot bolt, both vertically and fore/aft.
I find U bolts in the deck convenient. Normally they are used for barber haulers. In this case the "guy ropes" are the masthead shrouds. If you don't have them you'll need to use halyards or fit temporary ropes from the diamond spreader roots. They should be tight (black lanyards)
You now also need to fit two more guys (white rope below). These go from the forward end of the boom to this same U bolt, one each side and stop the boom falling sideways as it goes up. See later photos.
This shows one of the advantages of the deeper mast beam. With a lower beam you have to fit the U bolts on the inner cabin sides to get them to line up properly. That's OK but the support angle is less. On some designs, like the Strike 18 for example, the mast step is the highest point so you need (removable) extra long chain plates. See the Strike 18 updates page for a photo
Once the mast is safely "stayed" you can remove the forestay and tie it out of the way - but keep an eye on it as you lower the mast
All is now ready to lower, obviously you don't need to winch as gravity does the work. But you may find you need to push the mast to get it to start moving backwards. Then slowly ease out the winching rope, remembering that the load will increase as you lower it.
Cleat it off at any time
Almost down, in these pictures, above and below, you can also see the "guy ropes" from the boom end (now the top) that also go to the deck U bolts. These stop the boom (now really a "mast") from falling sideways. You can also see you don't even need the complete cockpit floor to work safely. And you can do it when afloat as I did
Note: you can use exactly the same system and lower the mast forwards. Clearly you then fit the boom on its normal gooseneck. However I prefer lowering this way as otherwise what do you do with the forestay - especially if you have a jib furling spar that doesn't like being bent
This method works on large boats as well! This Nimbus has to take its mast down every time it goes to sea as it is moored the wrong side of a low fixed bridge. In 25 years the boat has sailed over 50,000 miles so mast lowering is commonplace!
And these photos show Hans' solution on his Strike 18. He says he can easily raise the mast himself. The photos are self explanatory, adjust as required to suit your own mast and boat. Of course you could also make the A frame in aluminium rather than wood.
- Advertising
- Find the Magazine
- Good Jibes Podcast
- Boat In Dining
- Sailboat Charters
- Business News
- Working Waterfront
- Youth Sailing
- General Sailing
- Repair & Maintenance
Raising the Mast of a Small Sailboat with The Resourceful Sailor — The Solo Version
It’s been a while since we’ve heard from The Resourceful Sailor. Since he lowered the mast on his boat Sampaguita last June, he’s been busy taking care of several boat projects. Now he’s back on deck and has sent us this detailed report on raising the mast.
What goes down must go up? After a rig refit, the mast of Sampaguita , a Pacific Seacraft Flicka 20, was ready to be raised. Still in her Port Townsend slip, the process was, generally, the opposite of lowering, presented in ‘Lectronic Latitude on June 16, 2021 — Lowering the Mast on a Small Sailboat with The Resourceful Sailor .
It required the same bridle setup. The boom, again, would act as a gin pole to gain the proper angle for leverage. The mainsheet block and tackle would do the heavy lifting. Rather than write the same thing again, I will focus on the differences between the two procedures and provide some previously left-out insights. In doing this, I will presume that you have read or will review the installment mentioned above.

For raising, only the cap shrouds and the headstay needed to be attached to their respective chainplates. Out of respect for Murphy’s Law, the other wires were secured tightly to the mast to mitigate their inclination to get snagged. Snagged wires like to kink, and whether new or old, it is unsatisfying, not to mention detrimental to their longevity and strength. The turnbuckles were wrapped in rags and secured to the mast, preventing them from scratching and banging into anything (everything.)

The bridle setup was more challenging to organize with the rig down than up. Since I had new wires, I needed to re-seize the stainless steel rings to the cap shrouds. It required holding up the wire to determine the proper pivot points with the mast. Then the opposing force lines to the lower stay chainplates were added, conceptualizing the rigid triangle necessary to maintain the pivot points. With the rig up, it is easier to build and see this. But down, it is a floppy mess. Then, a line was attached to each ring, ready to lead to a bail on the boom. A block and tackle served nicely for this on one side for ease of adjustment. These guylines will provide the opposing forces to keep the boom centered.

After that, I moved the mast to the tabernacle and pinned its base in the ready position. A final review of the halyard and wire leads and spreader orientations was done. A reminder: Always be on the lookout for snagging wires and lines whenever you move the mast.

The boom, as a gin pole, could then be added. When lowering, it was already in position and there was only the matter of attaching the bridle lines. However, with the mast down, the boom would be attached starting in a vertical position, which involved some boat yoga. I shackled the mainsheet and topping lift to its outer end. Lots of slack was fed into those lines, allowing for lifting it straight up. While holding it so, I pinned the mast end to the gooseneck. I picked up the previously-led guylines (the line and the block and tackle) and attached them to the boom bail. I tightened and adjusted the mainsheet, the topping lift, and the guylines until the boom was centered and vertical. The opposing forces held the gin pole in place.
With the correct bridle setup, the mast base in the tabernacle, and the gin pole in place, it was simply a matter of hoisting the mast. On a Flicka 20, the round bar traveler and the four-part mainsheet block and tackle are very accommodating to providing the mechanical advantage necessary for raising and lowering the mast. To a soloist, this advantage was indispensable. It took two hands and a bit of leaning to get it moving, but it became easier as it went higher. An eye was kept on the centerline alignment of the mast and boom, making sure the bridle prep was accurate, and watching that the wires did not snag.

The accompanying video shows the raising from a first-person view and solo. In contrast to lowering the mast, gravity is less of a friend, so the ascent is slower, with a bit more heave-ho. There is no shame in re-lowering the mast to adjust the bridle lines or sort out the wires. It is better to correct them early than to think something will be all right when it is not. Raising and lowering the mast is not rocket science, but 99% of the gig is proper preparation. If something goes wrong, it could be catastrophic, so double- and triple-check. It can be intimidating at first, but it is simple physics and simple tools at work. Remember, keep it safe and prudent, and have a blast.

This is so stressful to watch! I would have never had the courage to do it myself. As always, you have my respect and admiration. Well done!

Rusty, thanks for the kind words, and thanks for reading.

Joshua, Thank you for taking the time for so nicely relaying your experiences on single-hand stepping the mast on your Flicka. I am currently refining this design process for my own boat, and am thus interested in the finer details. My initial questions are two: First, concerning the method and material for seizing the bridle to the cap shrouds: As you state, a properly rigged bridle is key to making the process work. How did you analyze the adequacy of your seizing method and the loads that would be experienced?
Temporary seizing is a good place to start for me, but since I do this spring and fall every year, I have considered incorporating a more permanent nicropress and cable pigtail for the ring attachment (the loads there are not very high). A triangular plate in the top shroud with attachment points for the bridle connection points would be nicer, but more expensive to implement. Either way, it is probably prudent to use a temporary seizing first, to demonstrate dimensional functionality prior to a permanent solution. Second, I am sure you release the cap shrouds to allow the bridle arrangement some up/down movement as a result of the mast butt movement in the tabernacle during stepping. Somehow I must have missed that. Once upon a time I tried raising the mast with very slack uppers (guessing at what was needed instead of graphical analysis or calculations) instead of the bridle approach (all else was like your scenario). Because the slack was inadequate and no bridle, I managed to bend my boom out of alignment. :o(. A good machine shop worked that out. As long as the mast remains vertical through the lift, there isn’t much load on that ring connection, but its job is keeping the mast in a vertical/perpendicular orientation through the lift. But if some kind of unforeseen incident would create shock loading on the seized ring, (say even 2 pounds of lateral movement (force at the truck) that would correlate to about 56 foot-pounds of moment (engineering statics) applied at the ring due to the long lever arm of the mast. If it were 5 pounds force perpendicular at the top of the mast, it would correlate to up to 140 foot pounds. In my view, a shock load of 5 pounds or maybe more, isn’t an unlikely scenario, considering Murphy. I can’t think of a way to analyze the strength of the seizing, and prayer does not work for me. So, how did you analyze the adequacy of your seizing method and what did you use? Wire? In my case, I have been stepping my mast at least annually, on my Lancer 25 for more than 35 years. I usually do it on the hard, or in the water if launching was via travel lift or something else that dictated the mast needed to be down when launched. But in at least one case, years ago, while sailing near Cowichan Bay at Vancouver Island, the jib wire jumped the sheave (a result of rough water and a slack line while dousing the jib) at the truck, and jammed along-side of the sheave when I tried to pull the sail down. I wasn’t sure of the problem at the time, but the sail definitely was not coming down, so I wrapped the jib halyard around the forestay to try to contain the partially-filled sail and considered my options. Luckily, upon checking my depth sounder, and found some shallow 30’ water (unheard of up there) and dropped the hook (probably on a rock bottom) and it held well enough for the task at hand. My mate always helped tail the line connected to the backstay at the winch and through a clam cleat to hold things if I needed a rest. I just loosened and released the rigging as necessary, muscle-dropped the mast and used the dinghy to go forward and sort things out. It was a very high reach, but I was successful. After I got the mast back up it started to rain….. I later drilled a hole in the truck to insert a stainless wire restraint, so the halyard cable could not be thrown off the sheave again. I have toyed with analyzing more mechanical methods for raising the mast now that I am older, less strong, and my first mate has passed on. That is what piqued my interest on your article. The Flicka is ready-made (Bingham designed it in; I am sure) for this raising procedure. The Flicka doesn’t have many complications, since there are double lowers in perfect position for the bridle attachment, and the cap shrouds are neatly centered to the mast. The Lancer is not so nice. It has a single set of lowers, and the chain plate has about 1” between the 2 connections for uppers and lowers. These are also set about 3” aft of mast centerline. The original Lancer design was a tabernacle (not exactly the proper technical term, but we will go with it) with the slot in the tabernacle tabs, and a through bolt for securing the mast. I would say this is the usual case for production trailer sailor boats. I have never been wild about the uneven up-and-down friction-prone mast butt action and the associated movement reflected in the rigging connections during stepping. I do have a strong toe rail to connect the bridle, but the chain-plate bridle connection will not work geometrically. I have purchased a hinged tabernacle plate from Ballinger Spars, which will smooth out the rotational process down there. However, the negative thing it does, is place the pivot point about 3” in front of the mast centerline. The hinge movement is forward of the mast (eccentric) and translates to about 3” up-and-down movement (tensioning or slacking) of the cap shroud/ bridle assembly while stepping the Lancer mast. With the eccentric hinged plate pivot, (while rotating up), the mast butt raises momentarily for about 1/4” (slackening the rigging) and then drops down 3” (requiring an equal amount of rigging slack or things will go into tension, which is no good). The shrouds or bridle assembly must allow a lengthening of 3” during rotation of the mast butt into final position (as determined by graphical analysis). On lowering, the movement is opposite, so the shrouds will slacken throughout rotation without causing any tension problems, and there is plenty of play being created to keep any stresses from developing. I suppose the key in my case is to set the bridle configuration when the mast I up, thus ‘dimensionally building in’ the 3” movement required into the bridle/shroud system. Thoughts? The following is an analysis of the forces on the Lancer rigging dimensions and mast weight: The mast (Kenyon 3550) is 28’ long and weighs in at 62 pounds. I arbitrarily rounded to 70 pounds for these calculations. The moment to initiate lifting the mast is 980 foot pounds. (28’x half the mast length x70 pounds – assume equal weight distribution per foot.). That is to say, if the mast is on the ground and you lift one end, it will take 35 pounds force through a distance of 28 feet (=980 foot pounds of moment acting on the mast to lift one end off of the ground). But in raising the mast, the force is pulling more aft than up (requiring vector analysis which I will get to). I am currently considering a 10’ jibboom mounted at the hinge point and not higher on the mast where the boom lives, which changes the numbers- (no bending forces on the mast – which are not really great enough to mean much to the 3550). Also in the Flicka case, boom length (as with lancer) is probably about 8’. A 10’ jibboom lowers the forces more than an 8’, but using the existing spar is practical. It is probably prudent for me to reconsider and re-calculate using the boom in its usual position. A few years ago, I designed and had a fitting made to connect a jibboom to the mast foot, so I was considering using it. So, running the numbers based on the Lacer backstay distance to the mast and initial lay of the mast, it would take (rounded) 103 pounds of tension in the backstay from the mast truck to the jibboom, and 125 pounds of tension from the jibboom to the backstay connection point. Compression loading in the 10’ boom is 114 pounds. Yes, one can use Eulers equation to analyze buckling forces, but I didn’t do it. Following good engineering practice with a factor of safety of at least 2, these numbers would be double the values shown for design checking of adequacy of rigging and spars. Confirming your experience, as the mast goes up, the center of gravity moves aft, requiring less and less force to raise the mast (and the geometry is changing) to increase efficiency of the forces as the mast goes up. 30degrees=858 ft lbs, 45 degrees=700 ft lbs, 70 degrees=350 ft lbs. 70 degrees into the lift, it would equate to 10 pounds of perpendicular force applied at the top (the center of mast mass has shifted to only 5’ in front of the final mast position). With a 4:1 ratio applied on the backstay, the pull on the line is about 31 pounds force for the Lancer System. The Flicka system is somewhat more (I don’t have the dimensions to analyze it), but from your description it was probably 40 pounds or less to start the raise, and then the tension required reduces as the mast goes up. Since the pull for the lancer scenario calculates in at around 31 pounds, I am planning to run the bitter end of the 4:1 through a block at the stern, to the bow, through a blocks on the bow, and use the anchor windlass to pull the mast up (the windlass maximum has 400 pounds of tension available). So even with friction losses, there should be no issue. I have a windlass switch in the cockpit, and a second hand-held remote at the forward hatch. It is a very convenient setup for going forward and guiding the mast or sorting out issues. Also, after my spouse passed, I put a winch at about 5’ high on the mast, and I ran the raising line there, instead of needing someone tailing at the cockpit. It is easier (almost necessary) to have a helper with me at the mast. I have lowered the mast alone with this manual system by taking wraps on the winch and playing out slack while catching the mast. However, without a jibboom, the forces are tougher to man-handle alone at the end of the lowering process. Comments are appreciated, as there is always something else to be considered or learned. Thanks
Jim, Thanks for reading and taking the time to engage. You have certainly been thinking about this! You get far deeper into the physics than I ever have and I suspect, many readers and sailors. Regarding seizing the rings on, I don’t overthink it. I have some net twine and I wrap and figure-eight it until I am sure it is strong enough. They are not permanent installations but are easy for me to put on as needed. Thoughtful marlinspike would make a nice permanent install. I have seen a different Flicka install that had the cap shroud turnbuckle placed at the pivot point. This removed the need for a seized-on ring and also gave a nice pivot point that does not bend the wire. Kinking the wire is my big concern, but the forces and the pivot point have not been high enough to do this, so without doing the physics calculation, the stress is low. Regarding the extra slack in the cap shrouds to accommodate that extra lift that occurs as the mast tips forward, no, I did not mention it, but it is a thing. I learned of that when I did not have them slack enough on a lowering. I recognized what was happening, so rather than forcing it, I backed off, adjusted, and restarted. Article scope naturally means some things are left out. That is good intel on bending your boom though. I have found on a sailboat, that if something feels like it is not running free, something is wrong. I don’t force it.
Thanks for the reply, Joshua.
I am leaning toward installing a permanent 4-hole triangular plate in the cap shroud at the bridle connection. This would create clear movement for hinge point attachments, and address stresses that can occur there. The rest is just a matter of rigging things up.
Best wishes in the new year.
Leave a Comment Cancel Reply
Notify me via e-mail if anyone answers my comment.
Racing Continues Today Dramatic Collision at SailGP Sydney A collision between Great Britain and Japan took both teams out the race — and out of the remainder of the Sydney SailGP regatta.
TEMPORARILY BOATLESS What Should Chuck Hawley’s Next Boat Be? Chuck Hawley has sold his most recent boat and is hot on the trail for a new one.
Sponsored Post Skippers Wanted: US Coast Guard-Licensed Captains for Charters and Private Lessons For power & sail. Hourly rate from $50 up. Weekend and weekday work available.
Let Your Lights Shine Lighted Boats Continue to Dazzle the Bay The Lighted Boat Parades continue! Tonight, the St. Francis YC’s Decorated Boat Parade in San Francisco will travel between Crissy Field and the Marina Green.
Sponsored Post Stuff Your Stockings with Latitudes The perfect stocking fillers. And they're free!

- Forum Listing
- Marketplace
- Advanced Search
- About The Boat
- Boat Builders Row
- North American Yachts
- SailNet is a forum community dedicated to Sailing enthusiasts. Come join the discussion about sailing, modifications, classifieds, troubleshooting, repairs, reviews, maintenance, and more!
Mast raising / lowering system for the 23
- Add to quote
Happy New Year to all of you Spirit 23 aficionados. I am pulling my 23K out of the water for a new bottom job. My question is does anyone have a good mast raising and lowering system that you use on your 23? Previously with lots of help I have muscled it up and down, but need a better way. What is your method? thanks, Dthriftusa
i had help the first time i lowered the mast on my spirit 23 after that i lowered it and raised it by myself every time . i have all the halyards tied on the cleats on the mast so they are the same lenth . i hook all the halyards togther using a mountain climbing d ring that d ring is tied to a lenth of mountain climbing rope . i have a long flat nylon strap i tie to the boat trailer in front of the winch post on the trailer so it cant slide backward . the strap comes up between the bow pulpuit and has a d ring attached to it and a rescue 8 with ears is attached to that . properly run the line from the mast through the rescue 8 . pull everything tight and tie the line off to the mast . i have a tall mast support secured to the stern pulpuit it is shaped like a Y so the mast will fit inside of the y . once everything is ready i put some slack in the port and starboard shrouds and then detach the fore stay . stand by the mast and untie the line and start feeding the line through the rescue 8 and lower it into the mast support . once it is in there pull some slack in the line and pull the pin out of the deck plate carefully pull the base of the mast to the bow pulpuit once it is there i have a mast support that the mast and spreaders fit in . mast is removed from y support and rest on stern pulpuit the rescue 8 with ears gives enough friction you will have to feed the line
Thanks for the information Southern Spirit. Although I am not sure how to use a rescue 8 nor have one at present, I think that you are attaching the halyards to it and it is attached to a D ring attached to a strap tied to the trailer. Is the climbing rope threaded onto the rescue 8 hooks and used as a friction point for raising and lowering? Does the strap act as a gin pole? Or by having a tall stern mounted mast support you may not need a gin pole. Is this the idea? thanks, dthriftusa

Gin pole!
mast support
Attachments

rescue 8 with ears

Thanks Southern Spirit and Denise030, The pictures are a great help and the video too. I'll post a reply when I get the boat pulled. I don't have a tongue extension and will need the boat lifted onto the trailer. Unfortunately the lift has a busted hydraulic hose, which will give me time to setup a system for mast lowering/raising. We like you are in the deep freeze right now anyway. best regards,
Thanks for all of the advice. We had a lovely weekend last and I finally got my boat lifted onto the trailer. I need a tongue extension before I can use the ramp. Otherwise my truck's cab fills with water. I cobbled up a gin pole using an 80" 2x4, 2 eye bolts and a 2 large woodworking clamps. Added the eye bolts to one end 180 degrees apart and shimmed out the other end slightly undersized for the mast thickness. Next added 1/2" thick oak planks on each side extending back about 11" past the 2x4. At this point all pieces were screwed together. Next, I slid the gin pole's oak side extensions over the mast and used two woodworking clamps to clamp the oak boards behind the mast. Nice and snug. Connect two halyards to the upper eye bolt and the mainsheet tackle to the lower eye bolt. The ratchet end connected to the stem fitting. With a helper gently guided the mast onto an 8' 2x4 mast crutch with a foot crossbeam the width of the cockpit floor. It was tied to the upper rail and secured with line between two stanchions preventing sliding. Next time I will use two rope guy lines to keep the mast centered if a helper is not available. The only problem I had was that my mainsheet was about 10' too short. I had to take the line out of one sheave to be able to lower the mast all the way to the crutch. Or possibly use a longer crutch. This 23K showed no signs of blisters anywhere even after being in the water 2.5 years. I'll dry her out and add new barrier coat to any exposed glass then new bottom paint, do some other repairs, move both batteries to the bow and back into the water she goes. Here is a picture link if you haven't seen a 23k. https://plus.google.com/photos/116081365969363846969/albums/6106869770883783985?authkey=CIT3zbjzl9y_8AE[/URL]
https://plus.google.com/photos/1160...116081365969363846969&authkey=CIT3zbjzl9y_8AE My Spirit 23K ready for the repairs to begin. First picture did not work for some reason.
Wow she's a nice looking boat... I like the trailer as well.
Nice boat, It's interesting to see the fin keel version. Oh, and on topic I posted a bit about my mast raising system here: http://www.sailnet.com/forums/965690-post15.html The gist of it is I installed a couple stanchion fairleads on the stanchions in line with the pivot point of the mast (stanchions are already lined up well) and a mast eye on the past about 6 feet up. I have 2 lines with clips on either end. These server to stabilize the mast side to side as I raise it. Then I have a 2x4 with a small winch and an eyelet on it. I attach the jib halyard (and the forestay just to keep it where it needs to be) and the winch cable attaches to the bow cleat. Just wind up the winch and up comes the mast. With the sidelines its stable enough to leave it and untangle the inevitable times when the back stay or side stays get caught on something.
- ?
- 176.4K members
Top Contributors this Month

- Mast Raising Made Easy
- New MastMate Magic TC/DG
- New! MastMate SC
- Original MastMate
- Trade Enquiries
- Boats Using Mastmate Products
- MastMate Magic TC
- New MastMate SC
- Where to see Mastmate
|
SORRY NO MastMate SC-L left
MastMate SC
Standing A-frame mast raising and lowering system
I don't know who had the original idea, but thanks to Arlyn Stewart for posting and discussing it in various forms. I wanted to take my mast down this year to inspect the rigging and fix a mast light. I've had the boat for 3 years and never had the mast down. I could of had the marina guy come over to my boat with the cherry picker and for a fee he would have assisted; however, I've been wanting to get a trailer, and one of the sticking points in my mind was dealing with the mast. I've read copiously on various sailing forums, notably Trailer Sailor, about the various methods and systems of raising and lowering the mast; the gin poles, articulating A-Frame, etc.. Then I came across the Standing A-Frame and thought that looked interesting enough for me to give it a go. If the system worked well, I'd have one less unknown going into a decision about whether to get a trailer or not. I also now have a system, and set of tools that I can lower and raise my mast at any time. You can see a diagram of the system at the URLs above. I've also posted pictures in the photo section of this site. I probably over built it a little, but as you can see from the photos, I'm right in tight next to two other boats; I didn't want to take a chance and damage someone else's boat. The system is comprised of 2 2x4s that are bolted at the top and secured some how to the deck. There is a pulley at the top of the A-frame, I ran my bolt through pulley hole. A line is run fore and aft to secure it upright. The fore line needs to be strong and secured well, it takes the load. The aft line only needs to hold up the A-frame until you get the mast weight on the fore line. The length of the 2x4s is not critical, as it is in the articulating A-Frame method, I used 14 foot 2x4s. I chose 14 footers because I wanted the lest amount of stress on the line and A-frame; I figured the shorter the A-frame the more load. 14 footers puts the pulley near the same height as the spreaders. With the Beneteau 23.5's we are lucky to have holes in our toe rails, so fastening the bottom of the A-frame legs to the boat is a simple matter of bolting to toe rail. If you read through various ideas and methods of mast raising system, you'll notice that some sort of side to side (port starboard), or lateral support is often used. Often temporary lines, or shrouds are put in place. One method called for t- joints added to the mast about eight feet up and temp shrouds inserted for the raising or lowering, then removed. If you read some of the discussion on the Catalina site I've pointed you to, you will notice that NO lower shrouds are called for with the Standing A-Frame. I however, wanted the security of lateral support, especially with other boats in such close proximity. If you use some sort of shroud to support the mast laterally while lowering or raising, a problem exists if the point of connection to the deck is not on the same plane as the mast pin. If the shrouds are fore or aft, or higher or lower than the mast pin, they will either tighten or slacken during the raising or lowering of the mast. In order to keep them taught throughout the entire range of motion, they need to be anchored on the same plane as the mast pin. So I made brackets that bolt to the toe rail and allow me to attach the lower shroud to the bracket, and it's on the same plane as the mast pin. I wanted to use the lower shrouds on the mast instead of attaching any temporary lines, why not use what's there. As you can see from the photos, I used angle iron with holes already pre-drilled from the factory. You can get this at Home Depot, or Lowes. You'll need some sort of brace to counter the pulling load, I used some construction T bracket I had, you could use any number of things, such as more angle iron, steel strap, whatever. I put an eye bolt through one of the holes in the angle iron that put me at the correct location for being on the same plane as the mast pin. The lower shroud is removed from the turnbuckle and inserted into the eye bolt. I used a washer and the turnbuckle as a nut and tighten up the lower shrouds. The eye bolt turns as the mast lowers or raises and thus keeps the lower shroud taught, and anything from kinking. I lowered the mast with 20 knots of wind directly from Port and the mast stayed straight all the way down. To find the correct location for the eye bolt, low tech - insert a 4 foot 1/4 inch rod in mast pin hole and use this as a guide; or, high tech - some sort of laser leveling device might get you a more precise reading. I used the low tech method, worked great. Attach to the right A-frame leg ( for me as I'm right handed ) a trailer wench. I used nylon line that was tested for 3000 lbs breaking strength, working load 300 lbs. Run the line from the wench up through the pulley and loop around mast to make a bridle; I used a bow line. Attach main halyard to bridle, attach a messenger line to bridle, haul up bridle to spreaders. For the maiden lowering I wanted to secure an extra line from about mid way up the 2x4s to the anchor cleat, I wasn't sure how much pressure there would be on the fore line and wanted make sure nothing broke - it's probably not needed. Once everything is in place, take a turn on the wench crack until the baby stay is slack. Remove jib furler, and baby stay. I slackened the upper shrouds, not sure you need to? At this point the mast is being held up by the 2 lower shrouds on the temp brackets, and the wench line. Lowering the mast was a piece of cake, much easier than I even imaged. I lowered it , then immediately raised it to make sure everything would go smooth both ways. I made a mast crutch to catch the mast as it lowered. I used another 14 foot 2x4 with a Y at the top and several removable support arms a few feet down from top. You can see it in the photo called halfwaydown2. I lower the mast to the top of the crutch and then manually lowered to the lower support arms. I used oak dowels to make the support arms removable; with several sets of holes in the crutch I can position a support arm at any length. Since I don't have a trailer, the mast crutch sits on the ground and is lashed to the rudder gudgeons. at this local, the mast is top heavy once it is resting on the crutch and wants to topple over to ground. Luckily The main sheet kept the butt end of the mast down. If I get a trailer, perhaps I could position the mast crutch farther back, or make a free standing mast crutch that stands on the ground. Not sure, I need to perfect that part of the operation. The system works with ease and is safe, of course safety depends on a lot of things, how you build it and use it being paramount to that. But, one of the advantages of this system is you are on the fore deck in control of what's going on. If a line, stay, shroud, jib furler, needs to be moved a little to keep from snagging you can see and control it. With some systems, folks are using their trailer wench, so they are often down on the ground. You can also stop the lowering or raising at any given spot simply by lower or raise a wench click at a time.It took virtually no strength to raise or lower the mast with the wench. See a diagram of the Standing A-Frame here: http://www.stewartfam.net/arlyn/mrs.html See photos of my Standing A-frame in the photo/project forum, follow realted link Discussion of Standing A-Frame on Catalina site: http://www.catalina25-250.org/forum/topic.asp?TOPIC_ID=6027&SearchTerms=mast+raising
Tropical Boating Stories about Boats and Boating
April 19, 2010 By Tom 18 Comments  I have seen lots of different techniques and contraptions used to raise and lower the masts on small sailboats. All suffer from the same problems for solo sailors, and I recently came across a system that solves all of them neatly and for a fairly low price. While not tremendously heavy, small sailboat masts are long and awkward to handle, tending to sway to one side while being lowered or raised. It is possible with most boats to stand at the stern and pick up the mast and just start walking forward and pushing it up. The problem comes when you have to step up onto the cabin top while holding a heavy mast high above your head. It's usually a long step, and most people can't do it. Instead of lifting the mast by hand, many opt for a gin pole or A-frame and use the boom vang to get the mechanical advantage needed to pull the mast up. Some trailers are fitted with a tall pole, allowing the trailer winch strap to be led to a halyard and used to crank the mast up and down. The A-frame support tends to hold the mast over the center of the boat, but gin poles on the boat or on the trailer will allow it to sway back and forth unless stabilizing baby stays are used. Using the trailer winch to crank the mast up and down means that singlehanded sailors can't see what is going on up on the boat, and it obviously precludes raising and lowering the mast while on the water. These difficulties are further compounded by the fact that small sailboats are covered with winches, cleats, boarding ladders, small outboard engines, etc., all of which tend to snag the shrouds or backstay as the mast goes up. If something snags, a sailor who is rigging the boat alone must find a way to hold the mast in a partially raised position while clearing the snag. It is important that the solo sailor be able to keep a sharp eye on all the rigging and stop immediately if any resistance is felt. A snag can mean moving from your position on top of the boat or at the trailer winch all the way to the stern of the boat, where the backstay has managed to catch the rudder or boarding ladder. It is often impossible to leave the mast precariously hanging in the air, so it must be lowered to fix the problem. The terminal fittings on the ends of the shrouds are strong when in position and tensioned, but they can lodge themselves sideways as the mast is coming up and bend when placed under load. The fittings that hold the upper ends of the shrouds in the mast must rotate as much as 90 degrees as the mast goes up, and if they lock up instead of turning freely, it is easy to bend the swage fitting when they come under tension as the mast is nearly stepped. Down at the deck, the fittings must also rotate as the shrouds go from lying aft on the deck to standing up straight. Singlehand sailors must watch the ends of the rigging carefully to ensure that all of them are operating as intended while the mast is going up. If a fitting binds up, once again it becomes necessary to either leave the mast hanging or put it back down to correct the problem and try again. Boats with roller furling jibs present an additional problem, as the jib furler drum tends to bounce down the deck and the sail itself acts like a giant snake having a seizure. The furler drum and forestay end fittings can scratch the deck of the boat and can get snagged on bow cleats, opening hatches, and other hardware around the foredeck as the mast is being lowered. When raising the mast, the roller furling jib generally does not want to slide forward on the boat by itself, and must be pulled along and kept near the center of the boat to avoid kinking the forestay wire or binding up the fitting that holds the forestay to the mast. Last but not least, the mast needs an appropriate place to land when it comes down , and a good place to start on its way up. Sailors must use a mast crutch of some kind, and for trailering a sailboat it helps if the crutch has two positions: a low position for holding the mast during transport, and a higher position to give a little head start when raising the mast. Having a roller on the top of the crutch is also handy for solo sailors because it makes it easier to move the mast back and forth from trailering position to the mast step. The Mast Raising Solution for Single-Handed SailorsI recently saw a solution that addresses all these problems and makes single handed mast raising on the water or on the trailer a fairly simple procedure . This system was in use on a Precision 23 sailboat, but can be used on any small sailboat. The boat has a mast raising pole for a MacGregor 26M with an ingenious addition to help manage the furling drum, a set of baby stays to hold the mast on centerline, and a small dinghy motor davit mounted on the stern and outfitted with a U shaped mast crutch. The owner of the boat put a lot of thought into this system because he wanted to sail his boat from his dock behind a low bridge from the harbor. Even though it uses a MacGregor mast-raising pole, this system can be installed on nearly any small sailboat. Click on any photos for a larger view:
This system can be adapted to fit any small sailboat, and it makes stepping the mast by yourself a much easier task. If a snag occurs during mast raising, it is possible to leave the mast partially raised to go and clear the snag. The winch used on the MacGregor pole is self-braking and almost silent, and the operator can see everything while cranking it. The extra length of line to force the jib and furler to ride up and down the centerline of the boat is a stroke of genius. The addition of a properly designed roller mast crutch makes moving the mast back to the step by yourself easy for one person. Update: May, 2012 - Since I wrote this article, many people have contacted me asking whether I sell this mast raising system or know where to buy it. The answer to both questions is no, at least not as a package. You will have to buy the various parts and put them together yourself. You will need the following items to assemble the mast raising system:
The first three items on the list are to make your own mast raising pole of the type sold with MacGregor 26M model boats. I would simply buy one from a MacGregor dealer instead of making one, but you can probably make it a bit cheaper. I would not mention to a MacGregor dealer that you intend to use it on a sailboat other than a MacGregor, as they might have liability concerns. December 27, 2008 at 12:27 pm Thanks for a great article. I’ve been reading other articles about mast raising systems, but they never had enough pictures to help me visualize exactly how things worked. The extra line for the furler is also great as it solves a problem I’ve seen several people discuss. June 18, 2015 at 9:33 am I have built one for my 1980 Macgregor 22. I would be willing to build one for the cost of materials plus $ 100 labor. It would be custom made for your boat. All you need to do is provide pictures of the mast base and tabernacle. You may contact me at: [email protected] Leave a contact email or phone number. January 29, 2009 at 12:25 pm This is the design I will follow for my boat. Thanks for the great documentation April 23, 2010 at 11:49 am I’ve got a Luger Tradewinds 26. I recently looked at the MacGregor system at a local dealer. It sells for about $150.00. I was going to buy one but then decided to make my own. I bought a piece of 2″ electrical conduit, a 600 # winch and a small pulley for about half the price of the manufactured unit. My only issue is that I don’t have a hinged mast step so I’ll be fabricating a bracket that suits my setup. I’d have to do that with the manufactured system, too. When all is said and done, I’ll probably be about $50 to $75 cheaper. March 1, 2011 at 11:19 am Great article, Ray! For those of you wishing to purchase the mast-raising pole, contact MacGregor Sailboats. May 16, 2011 at 11:11 am In the past 25 years, I’ve fabricated both gin poles and “A” frames to raise and lower the masts on boats from 21-28 feet. The 21 footer had a steel mast that was very heavy. My “A” from was made from 1″ square aluminum “pipe” with 1/8″ thickness. A bolt with eyes on each end passes through both legs with a bronze spacer between them. This functions as a hinge between the legs. One eye attaches to the forestay or topping lift and the bottom eye attaches to the tackle. The bitter end runs back to the cockpit/mast area where the skipper can control both the mast and the tackle. The bottom of each leg must hinge close to a line passing through the mast bolt and far enough apart to impart stability. Often, the cabin top is the only alternative. I placed eyebolts through the bottom of the legs with closely matching eye bolts on the cabin top. I used two eyes on the cabintop about 3/4″ apart. A simple pin with a keeper or a bolt passes through the 2 eyes of the cabin and the one eye of the “A” frame. June 2, 2011 at 11:09 am This is an interesting sytem. I’ve built and used one at the URL below. They obviously differ in a few ways but rely on similar principles. They also suffer from the same weak links, the attachment point for the pole to the mast or step in your case. And the auxiliary stay set-up. To be honest, I don’t like the idea of putting through holes in my mast for the bail or using my pintles for the crutch. The crutch is the easiest to work around. For that, I’ll take a piece of galvanized pole from the depot; try to find a cap for the bottom; drill two through holes in that to attach a pair of eyebolts which I can use to secure the pole laterally to the rails. If I can’t make a height-adjustable crutch so be it. I’ll fix it right above the cabin roof. For the attachment point. Since I’m using a system that attaches differently to begin with, I’ll leave that, but I have issues there. For the auxilliary stays. I’m really worried here. In a single handed operation this may be the weakest link. Perhaps this how the phrase “things starting going sideways” was coined. I like the chains. I’ll use them. I have chains for my stands, but it’s not easy to find guide wires like the one used here for the connection point. They look like old stays cut down. The process I used ties a tight line around the mast connected vertically to one of the halyards (instead of the bail on a through bolt), and attaches the baby stays there. I think I’ll try to find some low stretch line to make the connection from the loop on the mast to the chains. I think it’s really important that this be tight so clearly my idea of using the halyard suffers a bit (too much give). Here’s that URL for the gin pole: I put this together in 2 hours of twilight with a circular saw and my drill. I take no credit for the invention. http://www.google.com/imgres?imgurl=http://slowflight.net/upgrades/images/GinPole.jpg&imgrefurl=http://slowflight.net/upgrades/tips-GinPole.html&h=460&w=300&sz=32&tbnid=iyzi45IS37IlbM:&tbnh=128&tbnw=83&prev=/search%3Fq%3Dgin%2Bpole%26tbm%3Disch%26tbo%3Du&zoom=1&q=gin+pole&usg=__MAJzPBn9ofV8lK2r0D_01WD7ZQM=&sa=X&ei=p4bnTZCoCqnj0QGirvGCCw&ved=0CCgQ9QEwAw&biw=1131&bih=687 November 10, 2011 at 10:56 am great idea ,used to lift a 20′ pole in the ground. To put a light. Thank you sir. February 20, 2012 at 10:55 am I agree, this is by far the best/safest/easiest “Mast Rising System” I have seen! I’ve been wanting to build this system for two years now. I finally was able to either collected/make all the necessary parts to put it together. Thanks for the head start! By the way, if anyone is interested, I can make them one and ship it to their house. I don’t have a price in mind right now, but interested parties can call me. Thanks Pat 513 891 5112 October 11, 2012 at 2:07 pm Hello, That system looks great! I am interested in putting something together for our Ericson 25′. There is no mast hinge currently so I need to piece together the stainless steel components. I’ve called Dwyer and they were unable to help determine the parts after looking at the photos on this article.If you could help I’d greatly appreciate it. Maybe Pat Maundrell could help? My cell # is (828)337-5899 and email is [email protected] July 20, 2014 at 11:02 am Catalina, Factory Yacht, nor MacGregor will sell to the product. I have searched for at least 2 wks. I discovered the solo-mast raising system for small boats on Tropical Boating. Can you built one for me or any references. cell 434-242-1859 Thanks, Randy Boone March 29, 2015 at 7:54 pm Do you still make tis mast raising system June 21, 2015 at 12:28 pm I have a Catalina 22′ Sailboat & need a Mast Raiser. Are you interested in making one? If so how much would it cost? July 14, 2015 at 10:23 pm I’m not interested in making one. I’d recommend going to a MacGregor dealer and buying one of theirs and then adapting it to your boat. April 22, 2012 at 10:52 am This link was sent to me today by the seller of the (Australian design) Castle 650 (21’4″) that I bought yesterday afternoon. He has always sailed with a family crew of 4 or more, whereas I almost exclusively sail solo, and mast raising was looming as the biggest problem for solo sailing the Castle that I hadn’t solved yet! With some minor adjustments to the baby stays I now have my answer. I’m not sure what to make of the “where do I buy one” type replies – it’s a bunch of standard components which you buy and build the parts you need to suit the boat you’ve got. The important stuff is the idea, how it works, not the particular set of parts used on one boat somewhere in North America! I guess its because I’m an engineer and because boat production runs in Australia are so much smaller, so no one expects to be able to buy complete complex systems designed specifically for their boat. May 3, 2012 at 10:51 am Hello, excelent system, where can I get it, I really need it for a macregor 26 ’92 May 27, 2013 at 12:37 pm I followed the instructions and now have a great mast raising system for my precision 23. I am interested in the small crane that you use to hold the mast for going under bridges. (I already have the pole for trailer transportation). Do you have a picture of its installation and what type it is and where you purchased it. May 31, 2013 at 6:38 am Angus, I have no other pictures of that small crane on the Precision 23 stern rail, but it is just a stainless steel dinghy davit that the boat owner bought at a marine store. He put a piece of rubber hose on it to prevent it from scratching the mast. I do not know the make/model of davit nor do I recall exactly how it was installed. I do remember that it was not custom built. It’s a commercially available davit that is used to pick up dinghies and hoist outboard engines on and off of them. Sorry I can not be more helpful! Good luck! Leave a Reply Cancel replyYou must be logged in to post a comment.
Log in or Sign upYou are using an out of date browser. It may not display this or other websites correctly. You should upgrade or use an alternative browser . Mast that can be lowered?Discussion in ' Sailboats ' started by jmomcal , Aug 6, 2013 . jmomcal New MemberWe live in the Huntington Harbor and would like to switch from a powerboat to a sailboat. Unfortunately, there is a bridge with a 24 ft clearance that is limiting our choices. We've looked at Macgregor 26 ft boats with a mast that lowers but we would like a boat that is a bit bigger. Is it possible to fabricate a mast lowering system on a 28-30ft sailboat. If so, any suggestions on where to have that done? jehardiman Senior MemberYes, it has been done for centuries, mostly on river barges, lighters, junks, and hoys. It takes the right type of deck, house, and mast-step/tabernackles to make it work well with the hull, but any compentent shipwright/sparmaker should be able to put together a working unit. Google "mast tabernacles" for lots of examples. Just remember that you are not going to get something that goes up like a jack-in-the-box. You will still have to tension the rig, so it works better with traditional pole masts rather than modern multi-spreader rigs. Martin B. Junior MemberTabernacles and mast lowering Hi jmomcal & jehardiman, Virtually all yachts in Perth, Western Australia have hinged masts or masts pivoting in tabernacles as there are two low bridges to pass under en-route to the Indian Ocean. Below is a deck stepped tabernacle equipped mast on a 22 square metre (38') yacht. Note that the pivot pin is high enough for the lowered mast to clear the cabin top; also see in the bottom right hand corner of the pic that the chainplates have S/S triangulated fabrications to raise the lower anchor points of the shrouds to directly in line with the mast pivot - this is necessary to stabilise the mast sideways during the very short time you take for the actual lowering or raising action. The heel of the mast is curved to the radius of the pivot bolt-to-footplate of the tabernacle to provide the necessary clearance when lowering: note that the mast actually sits on the front 55% of it's foot and the pivot pin/bolt does not carry the mast axial load. Here is the same 22 square metre 30 years later - the same arrangement still in operation ! For yachts from about 23' upwards you need a.) two spinaker poles b.) a solid deck fitting near the chainplates from which they can pivot c.) a multi-part tackle you can attach to the forestay or jib halyards for the lowering d.) a solid "boom crutch" which is re-applied for the mast when lowered To simplify the lowering process and the setting-up of the rig after lifting, we use a highfield lever on the backstay to relieve the rigging tension thereby allowing one to detatch the forestay. It is not too difficult to get the modifications done if you have local access to aluminium fabrication/fabricators. Obviously you also need a mast support post under the deck down to the keel for deck tabernacle mounted masts. BUT in the mid 1970's a local spar maker started cutting aluminium masts on about a 70 degree angle from horizontal, adding (sloping) flat plates to each piece and putting a hinge pin on the aft side of the sloping plates. When the mast was up in position a couple of bolts go thru the front (lower) edge of the sloping flat plates to give continuity of mast stiffness. This method was intended to maintain the mast curvature/bending characteristics of a one piece keel-stepped mast which was considered to be necessary (by others, not by me - I was quite happy with the deck mounted tabanercle shown above and on my other 2 ocen racing [under-the-bridges ] yachts). If you need a better description then PM me direct [email protected] Attached Files:Flame 5s.jpg, flame 7s.jpg. Skyak Senior MemberI planned a mast lifting setup for my trimaran that might be a little simpler. I dropped the mast forward using the boom for the gin pole. To get the hinge in the shrouds I planned to splice in a toggle in the axis of the pivot and run cable from each of those toggles to the end of the boom. It's not as stable as solid triangles, but if your mast hinge can take a little slop it will work in calm conditions. If your mast hinge can't take some slop it's doomed the first time you move the mast without the rigging set perfectly no matter how the shrouds are hinged. The attraction of my plan is that there is just one small cable to stow. Note: my mast is only 36 foot so I can lift the bow end over my head to start.
Martin B. said: ↑ To simplify the lowering process and the setting-up of the rig after lifting, we use a highfield lever on the backstay to relieve the rigging tension thereby allowing one to detatch the forestay. Click to expand... Engineering design for mast step loadsAluminum mast from thin wall vaccum tubingHow many masts can you put on a tartan 34?Cracked mast step - replace cast aluminium with plate?Carbon mastsPultruded Fiberglass Wide Flange Beam for Use as Mast Compression PostMast bend test calculationsAttaching Rigging to the MastRemoveable mast compression columns ?Mast vs boat length
 |
IMAGES
VIDEO
COMMENTS
⚡Have a Special Mast Lowering System Request or a⚡Problem to Solve?! We can Help! https://www.patreon.com/dawn_hunters🔥🔩 Dock Box Talks 🔥🔩- Mast ...
Using Gin Pole Mast Raising System On A Hunter 19-2
To raise and lower the mast, I rig things and operate as follows. In this example, the mast is attached to a pivoting base and stowed lowered onto the bow pulpit. Between the athwartships attachment points and the mast tangs, I attach a set of temporary shrouds. These I made from coated wire rope (the same as used for lifelines).
Andrew Price explains how to use a gin pole and assemble tackle to raise and lower a sailboat mast. This is a 30' mast on an O'Day 26, and the gin pole was m...
If it is small enough to put on a trailer, whether or not you do, it probably is. (If you have a trailered sailboat, you likely already do something like this.) The mast of a Flicka weighs 60 pounds and is 26 feet long. Add the standing rigging and hardware, and you might be pushing 100 pounds. Not a daunting weight, but awkward.
8. hunter 23 wyoming. Sep 5, 2018. #1. I have a Hunter 23 and have tried several mast raising systems over the years and have finally found one that is superior to all others. It is fast, easy and safe, I found it on youtube under "mast raising tool". I made mine for under $50 and it works great.
Mast Up Sailboat Mast Raising System is an easy mast stepping device and supports your mast while trailering or storing. ... Mast Up! Put the pin in the turnbuckle, attach forward lowers to pad eyes and tune your mast. Reverse the process to lower. Contact Us. P: (541) 463-0555 E: [email protected]. 29772 Clear Lake Rd Eugene, Oregon ...
This A-frame system is an essential tool for anyone planning on trailering , raising/lowering mast regularly. The system is inexpensive to build , easy to assemble and extremely simple to use single handed. ... Raising or lowering the mast is easy using this simple "A" frame system and mast crutch. This setup uses two 10-½ ft chain link fence ...
3) Disconnected the two forward lower shrouds. 4) Slowly, ever so slowly, let out the line using the winch for control until the mast came to rest in the Mastup Mast Stepper from Catalina Direct. 5) Removed the bolt from the mast step, and rolled the bottom of the mast forward to rest in the bow pulpit mast carrier kit, also from Catalina Direct.
catalina 22 Islamorada. Feb 24, 2015. #18. I use a ratchet strap and attach the winch cable hook to that. The ratchet strap I attach about 6' up the mast so that I can reach it when it raised. I hold the strap in place on the mast using the sail slide and the thumb screws that I have for holding the sail in place.
Foldable Mast System. Balpha Mast is a foldable mast system for yachts, which allows for easy lowering and raising of masts. Southampton Boat Show - 2018. 'Balpha Global' is at berth M266 at the Southampton Boat Show 2018. See the video below for a live demonstration of our foldable Balpha Mast system.
Here's a DIY demonstration of raising and lowering the 35' mast using a hinged tabernacle, whisker pole, tackle, and manual anchor windlass on a 28' Pearson ...
24ft Strider sailing fast. 36ft Mirage open deck catamaran. Safe mast lowering method. This photo sequence shows the safe, reliable way one person can lower or raise a mast. It will work like this on boats up to about 10m long with 12m (40ft) long masts. However I have lowered much bigger masts this way with extra help.
1. Check by sighting up the backside of the mast to see how straight your spar is side to side. You can take a masthead halyard from side to side to ensure that the masthead is on center. Do this by placing a wrap of tape 3′ up from the upper chainplate pin hole on each upper shroud. Cleat the halyard and pull it to the tape mark on one side ...
After a rig refit, the mast of Sampaguita, a Pacific Seacraft Flicka 20, was ready to be raised. Still in her Port Townsend slip, the process was, generally, the opposite of lowering, presented in 'Lectronic Latitude on June 16, 2021 — Lowering the Mast on a Small Sailboat with The Resourceful Sailor. It required the same bridle setup.
Nice and snug. Connect two halyards to the upper eye bolt and the mainsheet tackle to the lower eye bolt. The ratchet end connected to the stem fitting. With a helper gently guided the mast onto an 8' 2x4 mast crutch with a foot crossbeam the width of the cockpit floor.
MastMate is a system for the raising and lowering of the mast on a trailerable yacht.. MastMate allows one person to raise or lower a mast single-handed. This task can be accomplished easily, quickly, and with safety. Mastmate has been developed over several years, and safety for the operator and other crew has been a major consideration in the development.
If you read through various ideas and methods of mast raising system, you'll notice that some sort of side to side (port starboard), or lateral support is often used. Often temporary lines, or shrouds are put in place. One method called for t- joints added to the mast about eight feet up and temp shrouds inserted for the raising or lowering ...
This is Episode #4 in the 10 Ways Wharrams Are Wonderful Series. We show how we lowered our masts by hand using the simple Wharram method. We used pretty muc...
Above: A side view of the sailboat with the mast raising system ready for use. This system can be installed and used on nearly any small sailboat to make solo mast-raising easier. A closer look at the MacGregor mast raising pole and how it is attached to the mast. The MacGregor pole is a tiny trailer winch mounted on an aluminum tube with a ...
MacGregor 26D with mast raising system (it lowers too). You need to look at the design of British narrowboats. Beam of 6'10". Draft of about 2'4" and headroom (above the water line) of 3'9". The Caledonian Canal carries lots of sailboats because it opens to the sea both ends and is essentially a series of lakes.
Tabernacles and mast lowering. Hi jmomcal & jehardiman, Virtually all yachts in Perth, Western Australia have hinged masts or masts pivoting in tabernacles as there are two low bridges to pass under en-route to the Indian Ocean. Below is a deck stepped tabernacle equipped mast on a 22 square metre (38') yacht.
We bought our Mac 26M used, and couldn't find any videos for lowering the mast--just raising it. Since ours was already up we decided we should share our exp...